Lecture Four: Kubernetes
What is Kubernetes?
At the most basic level, Kubernetes is a tool for orchestrating containers. In most scenarios these are Docker containers, but we can actually use Kubernetes to orchestrate any container that complies to the API specification (even VMs!). This tool will take us from running containers locally to running containers in production.
Pods
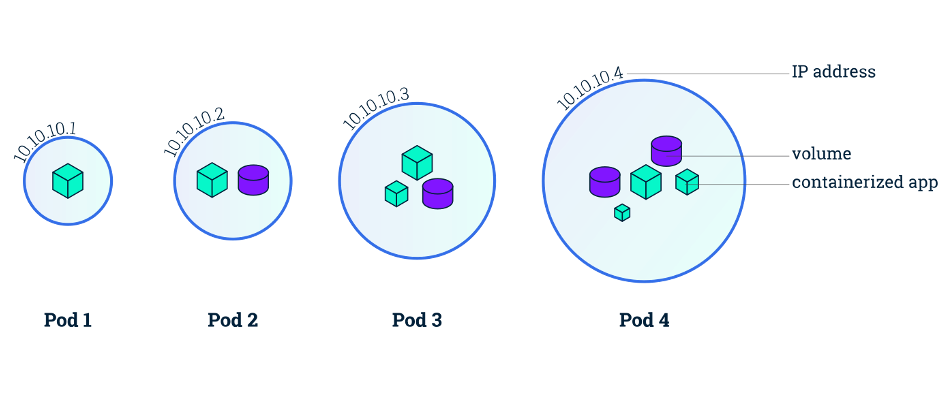
A pod in Kubernetes is the most basic unit of work. They are tight couplings of containers: this means they are containers running on the same machine (node) sharing the same network (though they do not share the same filesystem). Pods can be labelled for querying for later. If we had pods that were running the bender-catalog of our application, would could give them key app and value bender-catalog. This makes it easier to reference them we want to have these pods interact with other pods.
Nodes
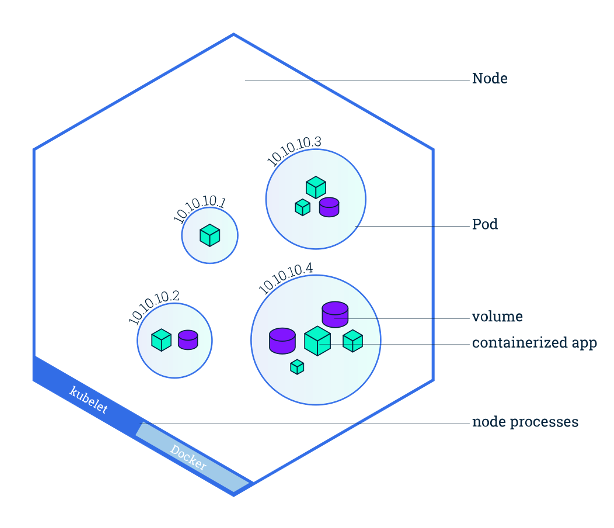
Nodes are hosts for pods, these are the actual machines (virtual or physical) that are running your pods. There are two types of pods: worker and main (sometimes referred to as master, but terminology is changing). The worker nodes are the nodes actually performing the work. The main node is the brains of the cluster. When we make changes to our cluster using the Kubernetes API, it is handled by the API server on the main node which then makes the appropriate changes to the cluster.
Deployments
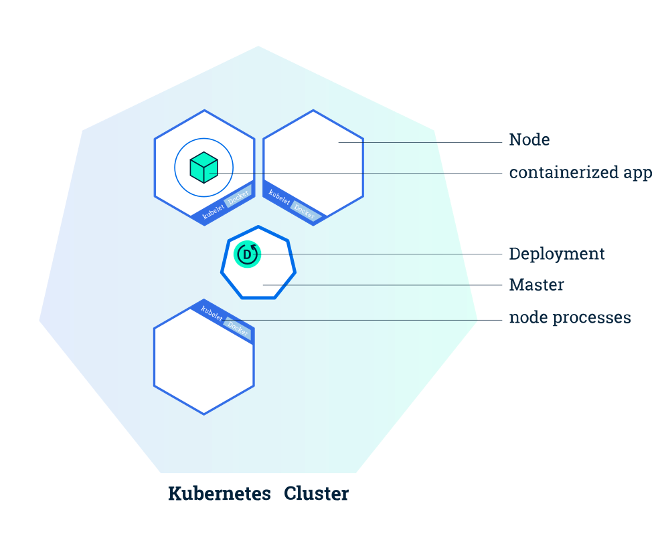
Deployments are groups of pods which are grouped by label. This way we can horizontally scale by replicating the number of pods that we have. We can use the labels to access the deployment as well as the pods within the deployment if we want to make any changes. In Kubernetes, there is a hierarchy where we have deployments with children that are pods. However, there is no child pointer from the deployment to the pods, instead it uses the pod labels to know which children belong to it. Going off of our previous example, a deployment might spawn 10 pods running our bender-catalog pod, the deployment will then look up all pods and group the ones which have key app set to bender-catalog.
Labels
Labels are a way to do quick lookups on resources in Kubernetes. Think of them as bookmarks to certain resources or the keys in a dictionary. It’s how pods and deployments internally handle their parent-child relationship, and we’ll see how labels will link together other resources as well going forward.
Services
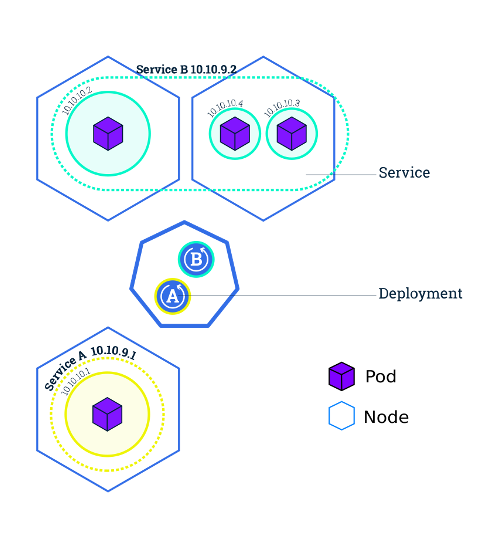
Each pod has its own IP address, but actually directing requests to the correct pod can be difficult when we have many pods. When a deployment has many replicas, the application would have to find out the IP of every replica and then decide which replica to send a request to. Services come into play by making the discovery of application locations within the cluster much easier. Services are associated with their own IP address and hostname, and when this IP address or hostname is hit by a request, the request will be forwarded to a randomly-selected pod in the service. The services are linked to pods by label, so any pod with a specific label will be considered part of the associated service.
Cattle Not Pets
The old model of deployment and operations was there would be infrastructure engineers who learned the specifics of any given server. They managed the server and tweaked the server to their uses: in this sense the server is a pet. The new model we propose is one where servers are all standardized and indistinct: they are cattle. From changing our perspective this way we gain a lot. Pods and nodes are reproducible and homogenized, so if one goes down we can easily replace it with one that has the same configuration.
Our goal in this class is to think of our infrastructure as reproducible and scalable. If we do that, we can’t have pet servers, since pets require individual attention.
Infrastructure as Code
Instead of having commands that we run interactively as we do a deployment, we instead want code that clearly specifies how we setup our infrastructure. The basic idea is that we want to move all of our manual configuration into serialized configuration files. If we are writing our infrastructure as code, then we can put it in a Git repository and use version control to manage changes. Moreover, we could automate our deployment process so that tools run with the infrastructure when we push commits to our repository.
This is a key idea in DevOps: we want to take these development practices, like version control and continuous integration, and apply them to operations and infrastructure problems to make everything cleaner, human-readable, and reproducible.
Demo
We want to deploy the Node app we’ve been using in previous demos to a local Kubernetes cluster. First, let’s build the Docker container for our app. Within the website repository (see lecture 2 if you have not cloned the repository yet) we navigate to the Kubernetes demo and build:
$ cd demos/kube_demo
# Build the Docker image for Node app and tag it v1
$ docker build -t node-app:v1 .
Next, before we can deploy to a Kubernetes cluster, we need to install software that will allow us to run a Kubernetes cluster on our local machine. In this course we will be using Kind (Kubernetes in Docker) which can be installed here. Since Kubernetes is defined by its API specification, Kubernetes “distros” like Kind have emerged which are 100% API compatible with Kubernetes, but appropriate for different environments, like local development. Once we have Kind installed, we can actually create the cluster:
$ kind create cluster --name kube-demo
Creating cluster "kube-demo" ...
 ✓ Ensuring node image (kindest/node:v1.20.2) 🖼
 ✓ Preparing nodes 📦
 ✓ Writing configuration 📜
 ✓ Starting control-plane 🕹️
 ✓ Installing CNI 🔌
 ✓ Installing StorageClass 💾
Set kubectl context to "kind-kube-demo"
You can now use your cluster with:

kubectl cluster-info --context kind-kube-demo
So, now we’ve created our cluster, how do we interact with it using the Kubernetes API? We need another tool, kubectl. You can install kubectl here. Once you have kubectl installed, try this:
$ kubectl get nodes
NAME                      STATUS   ROLES                  AGE     VERSION
kube-demo-control-plane   Ready    control-plane,master   2m26s   v1.20.2
This shows us the nodes that are running on our cluster. This demonstrates the verb-kind-selector structure of the API that we have mentioned before. In this scenario our verb is get and our kind is nodes. We are selecting for all of the nodes, but an example of the selector would be if we ran kubectl get nodes kube-demo-control-plane, we are specifically getting the kube-demo-control-plane node that we saw listed above. If we run kubectl --help we can see all of the different verbs that kubectl provides us to interact with the cluster. If we wanted more detail about our nodes, we could say:
$ kubectl describe nodes
this gives us an enormous amount of information about all of our nodes. Additionally, if we specifically wanted the YAML that has configured a certain pod, we can run:
$ kubectl get nodes kube-demo-control-plane -oyaml
and we see the manifest with which the pod was created.
As a sidenote, you might see when reading docs or on discussion forms people using k get nodes instead of kubectl get nodes or something along these lines. It is a common practice to alias kubectl to k on the command line. If you want to do this you can type the command alias k=kubectl in your terminal. However, this will only last for the given terminal session (if you close the window or try on other windows, the alias will not work). If you want this alias to be available all of the time, you can add the line alias k=kubectl to ~/.bashrc, the list of “run commands” located in your home directory that are run every time you start a new bash shell.
Now that we have build our Docker image and started our Kubernetes cluster, we want to run the image on the cluster. To do this, we need a Kubernetes manifest, this is what we have in /k8s/node.yaml:
---
apiVersion: apps/v1
kind: Deployment
metadata:
  name: node-deployment
spec:
  replicas: 3
  selector:
    matchLabels:
      app: node-web
  template:
    metadata:
      labels:
        app: node-web
    spec:
      containers:
        - name: node
          image: node-app:v1
          ports:
            - containerPort: 8080
---
apiVersion: v1
kind: Service
metadata:
  name: node-service
spec:
  selector:
    app: node-web
  ports:
    - port: 8080
A few notes, when we write these --- in YAML, that means we are separating the two objects so that they should be treated completely independently (one is a deployment, the other is a service).
Starting with the service, we set the apiVersion: v1 to tell Kubernetes that we are using version v1 of the Kubernetes API to create this object (other objects will use other versions, don’t worry about this too much it just has to do with how Kubernetes releases objects to their API). In the metadata we give the service a name node-service. The most important part here is spec where we define which selector to be app: node-web. This will look through our pods and find all pods which have key app set to node-web and include these as part of our service. We also add ports and port: 8080 which exposes port 8080 on the service.
Next, we have the deployment. Jumping right to spec we see that we set replicas: 1, so we will only create a single instance of this pod. We add a selector which matches the label app to node-web, so our service will include all pods which map app to node-web similar to our service. Next, we define our template for pods being spawned by the deployment. The pods will have metadata which has the label app: node-web. This is good because it ensures that our nodes will all have the correct label so that they are matched with our deployment and our service. We also define the pod template’s spec to have a list of containers which includes a container that has name: node and image: node-demo:v1 (this is the name that we gave to our container when we built at the beginning of the demo). Lastly, we want to expose a port on the container, we do this by adding ports and the mapping containerPort: 8080 to our container. Note that both our service and our container need to expose 8080, if one of them does but the other does not, the request won’t be able to make it all the way from the service to the container.
Finally, we can create the objects specified in our manifest by running:
$ kubectl apply -f k8s/
deployment.apps/node created
service/node created
We could run kubectl create commands manually, but we will almost always use YAML because it is more reproducible and it is easier to find errors with our config. Now, let’s check on the pods:
$ kubectl get pods
NAME                    READY   STATUS             RESTARTS   AGE
node-57649f9655-cd8sw   0/1     ImagePullBackOff   0          86s
So, our pod has encountered an error. The status is ImagePullBackOff which tells us that Kubernetes is likely having trouble finding the node-demo:v1 Docker image that we’ve instructed it to use when building the pods for the deployment (for additional information, we also could have tried kubectl describe pods node-57649f9655-cd8sw). The issue here is that our Docker image exists on our laptop, but not yet within the Kind cluster. We can move a Docker image from our local machine into Kind:
# Move the node-app:v1 Docker image into the kube-demo cluster
kind load docker-image --name kube-demo node-app:v1
Image: "node-app:v1" with ID "sha256:49e22e344d07ea22c7314f8e8f9e652f8cf6f78a98e1534d75d1c86f9c0c60fb" not yet present on node "kube-demo-control-plane", loading...
Now, we can check back in on the pods:
$ kubectl get pods
NAME                    READY   STATUS        RESTARTS   AGE
node-5b8c67c585-9jjn5   1/1     Running       0          21s
Without us even telling Kubernetes to try pulling the image again, it has already realized that the image is now available and started the pod. This is the benefit of Kubernetes being declarative; we said we wanted a pod running the Docker image node-app:v1 and once it becomes possible Kubernetes automatically moves into that desired state. There is one final step before we can view our Node app, we need to forward the node-service port 8080 to our local machine’s port 8080:
$ kubectl port-forward service/node-service 8080:8080
Forwarding from 127.0.0.1:8080 -> 8080
Forwarding from [::1]:8080 -> 8080
# In another terminal window
$ curl localhost:8080
Hello World: 6bd2bde0-b566-45e8-a3df-17b4f8581d6c%
This is great! Our Node app is now running inside of the local Kubernetes cluster and we are able to interact with it.
Finally, a shout out to the VSCode Kubernetes extension which provides useful tooltips and error checking when you are writing YAML for Kubernetes.
Image tags in Kubernetes manifests
Kubernetes’s declarative API will only apply updates to resources in the cluster when the resource manifest YAML changes. This is generally a good property to have, since like we’ve mentioned previously, idempotence is an important property in APIs since it lets us retry operations without worrying about unintended duplication. However, this means that if we’ve rebuilt our Docker image with changes and pushed the new image to the cluster’s registry, there’s no easy way to signal to Kubernetes that this image is different without changing its tag, both in the registry and in the YAML manifest. Once the new YAML is applied to the cluster, Kubernetes will notice that the tag has changed and pull in the new image.